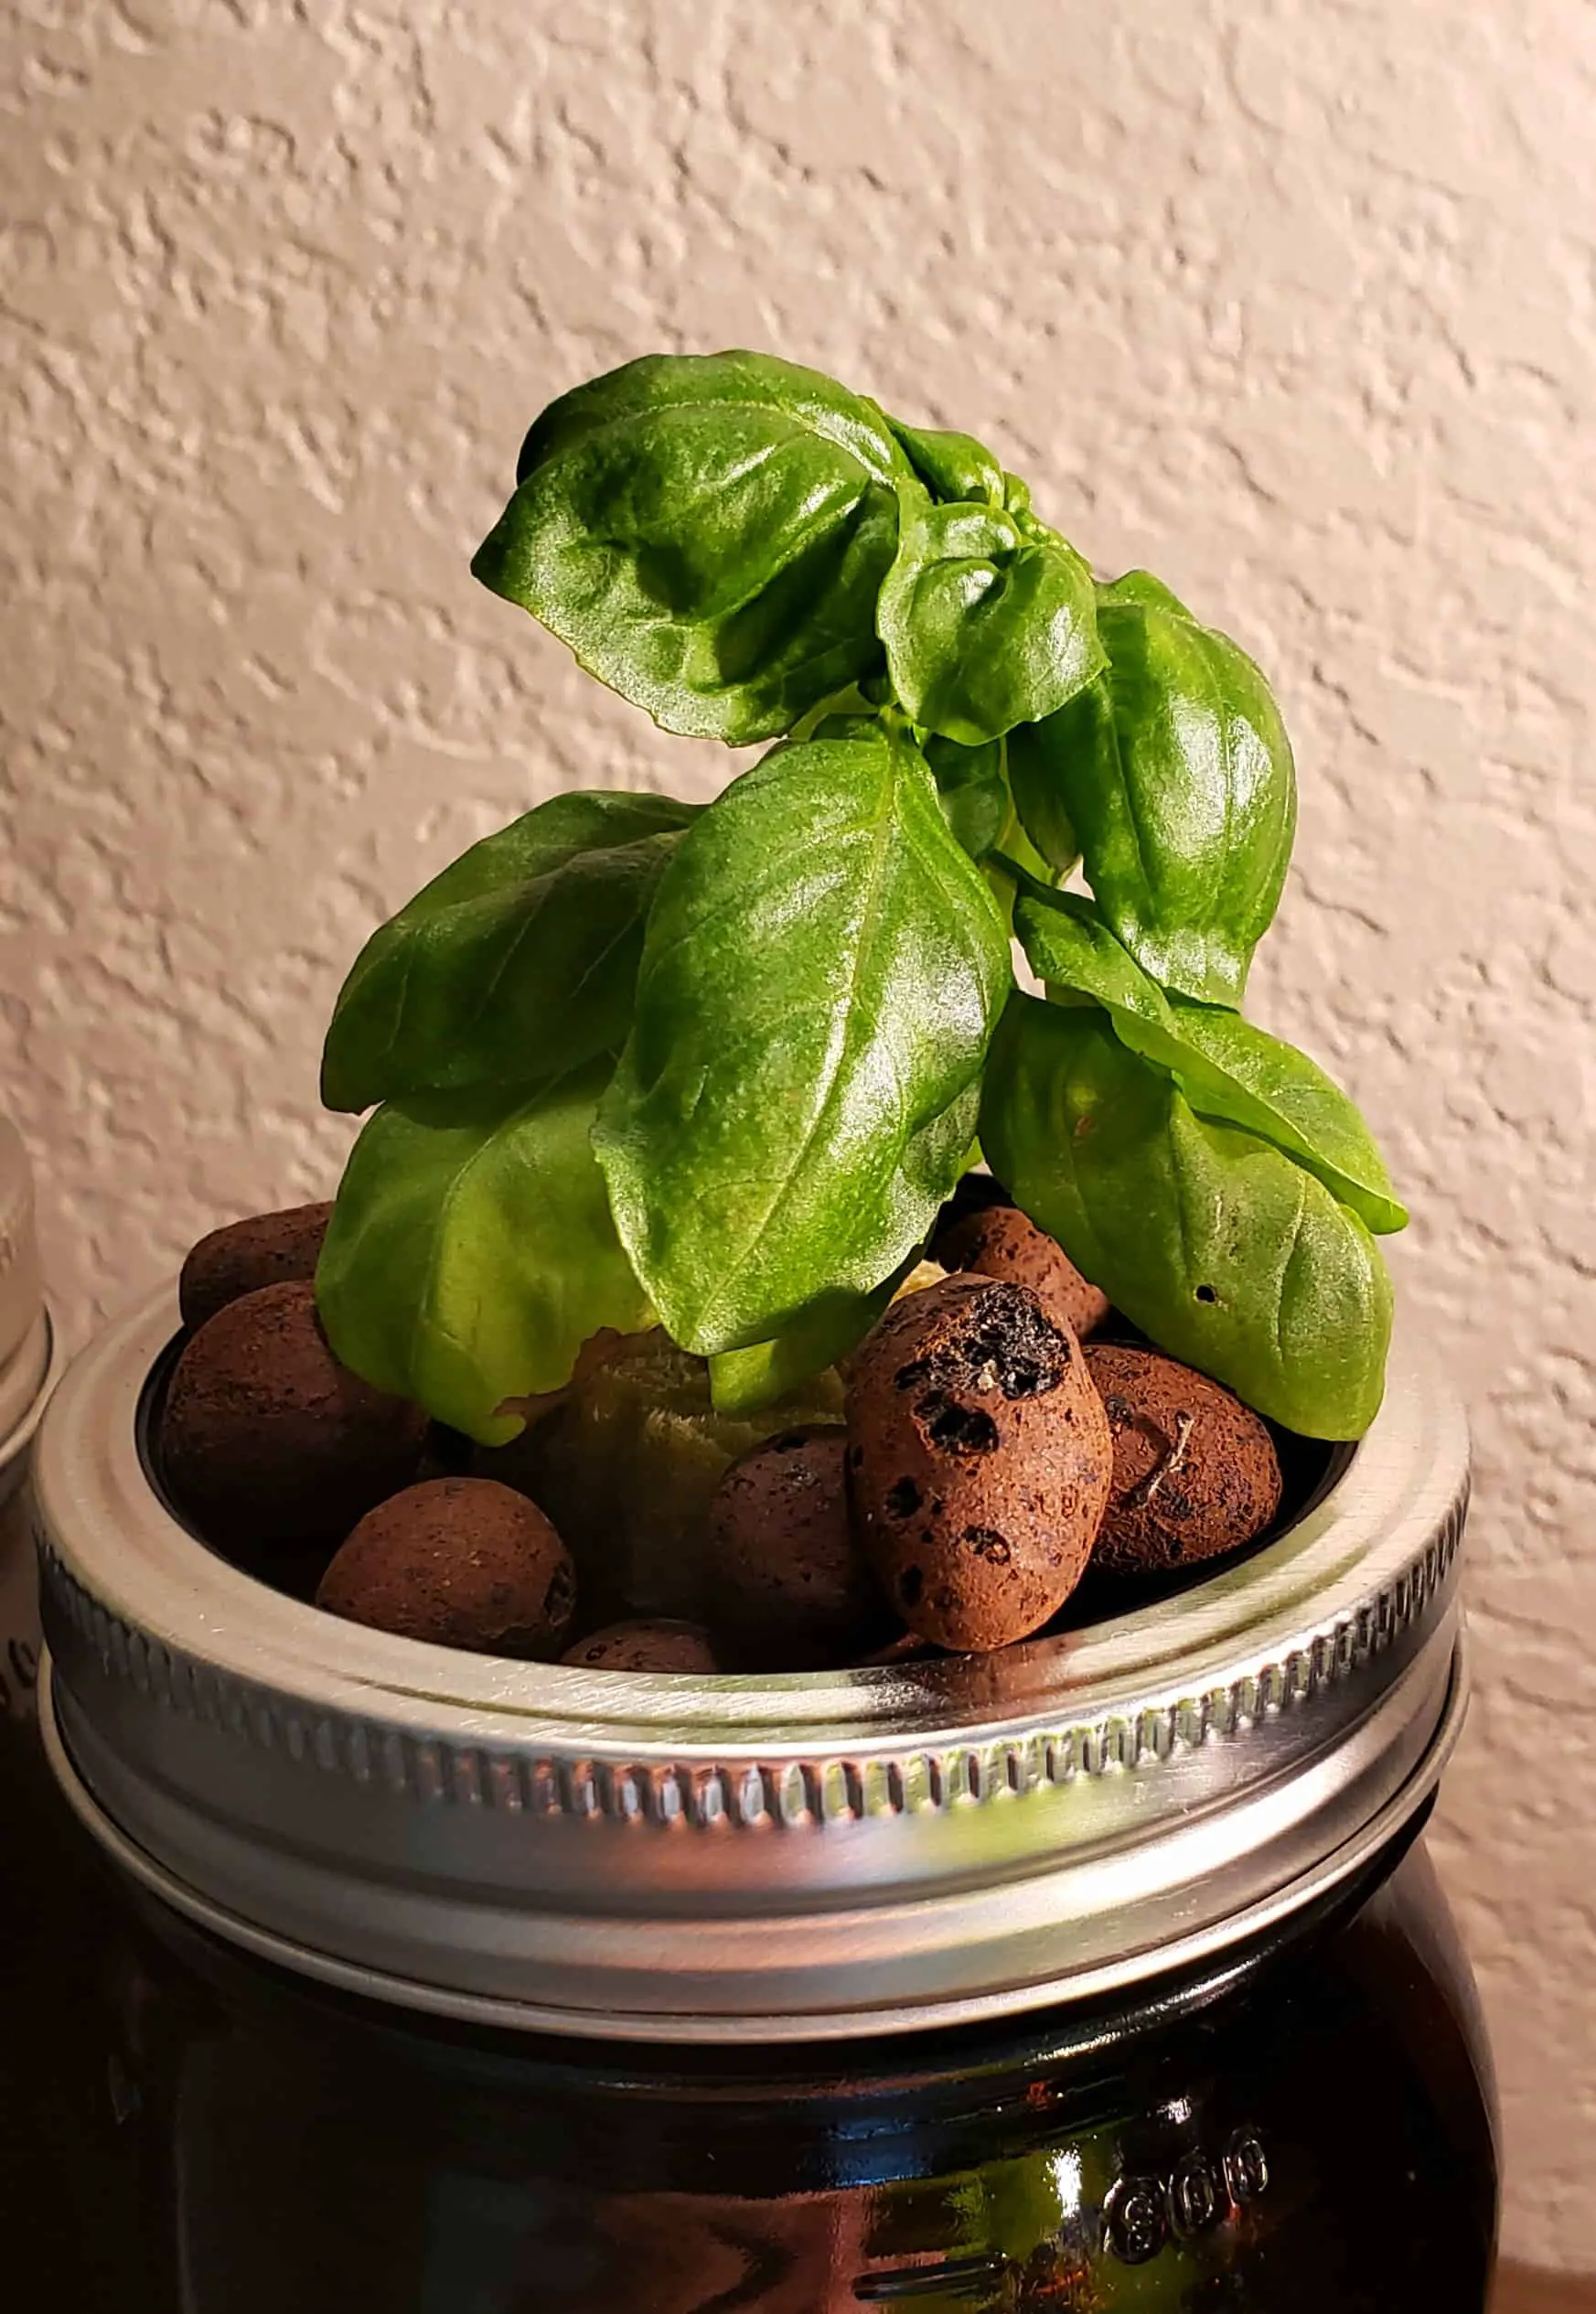
I have tried growing basil indoors using several techniques. The growing method that has worked the best so far is Mason Jar hydroponics. Not only does this system provide delicious basil for a variety of food and beverages, it is also stylish.
To grow basil in a Mason Jar hydroponics system, simply put a basil cutting in a cube of Rockwool. This Rockwool cube is then placed within a net cup full of LECA. Finally, place the net cup in a Mason Jar containing nutrient solution.
The rest of this article will describe what hydroponics is and why it is a good way to grow herbs such as basil. At the end of the article, I have provided steps that will help you grow your own basil in a Mason Jar.
What Is Hydroponics?
The word hydroponics is comprised of two Greek words: “hydro” means water, and “ponics” means labor. Hydroponics is a technique that involves growing plants without soil. The plants obtain the nutrients they need from a solution containing dissolved fertilizer.
In hydroponics, a growing medium is used to keep your plants in place in a hydroponic system. Growing mediums should be chemically inert and pH neutral so they do not react with the nutrient solution in your hydroponics system.
In recent years, hydroponics has become increasingly popular. However, the concept of hydroponics has been around for thousands of years. It can be traced back to ancient times. The Hanging Gardens of Babylon, which is one of the Seven Wonders of the Ancient World is one of the earliest examples of hydroponics. These gardens consist of a series of tiered gardens containing a variety of trees, shrubs, and vines.
There are a number of benefits to growing herbs such as basil hydroponically. For example, hydroponically grown plants tend to grow faster than plants grown using conventional soil techniques. In addition, hydroponic growing techniques use less water than conventional soil growing techniques and require fewer pesticides.
Hydroponic systems can be classified as active or passive. Active hydroponic systems involve moving nutrient solution with the use of pumps. In contrast, passive hydroponics describes a system that does not involve the use of pumps to move water.
Kratky Method
The Kratky method is a passive hydroponic growing technique that involves putting plants in a growing medium that wicks water from a reservoir of nutrient solution. Eventually, the roots of the plant grow down to the water surface. This method is named for Dr. Bernard Kratky, a professor at the University of Hawaii at Mānoa.
Kratky hydroponics is probably the easiest way for beginners to get started in hydroponics. Because there are no moving parts (e.g., pumps, air stones, or water lines), it is fairly easy to set up.
Just because the Kratky method is passive, it does not mean that Kratky hydroponics is completely “set it and forget it.” It is important to change out the nutrient solution every week or two. In addition, equipment should be cleaned and sterilized on a regular basis to prevent algae growth.
A common beginner project is planting basil in mason jars. However, basil grows even more quickly in a mason jar hydroponics system.
Hydroponic Growing Mediums
Two of the most commonly used growing medium in Kratky hydroponics is Rockwool and lightweight expanded clay aggregate (LECA). These are the growing mediums we will be using in the tutorial presented later in this post.
Rockwool

Rockwool is a chemically inert growing medium made of basalt rock and chalk. It typically comes in cubes and is available at many gardening centers. You can also purchase Rockwool on Amazon.
An advantage of Rockwool is that it has a lot of air space. Between 90 and 95 percent of the space between Rockwool fibers are filled with air. This air space holds oxygen, water, and nutrient solution that are easily accessible to plants. This makes Rockwool a very good medium for propagating plants.
Another advantage of Rockwool is that it can be reused. Before reusing Rockwool, sterilize it with diluted hydrogen peroxide or bleach. Then rinse the Rockwool before using it before a new plant.
Dry Rockwool can be a respiratory irritant when inhaled. In addition, Rockwool can be a skin and eye irritant. Wear a face mask, gloves, and goggles when handling dry Rockwool.
It is also important to keep in mind that algae can grow on Rockwool. Make sure you cover the Rockwool so it is not exposed to light. Algae will be found where there is a combination of water, nutrients, and light. By removing Rockwool’s exposure to light, you minimize the chance of algae growth.
Lightweight Expanded Clay Aggregate (LECA)
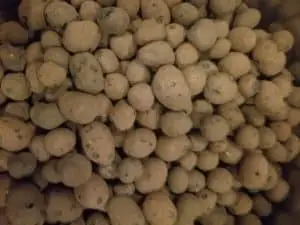
Lightweight expanded clay aggregate (LECA) is another very commonly used growing medium in hydroponics. They are also commonly called clay pebbles. If you have ever seen pots planted in what appears to be Cocoa Puffs on Instagram, that is LECA.
LECA is manufactured by heating clay to a very high temperature in rotating kilns. This process causes the clay to expand and creates air pockets pores. In hydroponics, the plant is able to wick moisture and nutrients through these pores.
An advantage of LECA is that it is very cheap. You can purchase it on Amazon. I have also heard that you can find LECA (and other supplies for semi-hydroponics) at IKEA for an affordable price. Another advantage of LECA is that it can be reused several times.
How To Grow Basil Hydroponically In Mason Jars
Mason jar hydroponics is a form of Kratky hydroponics. This hydroponic system involves placing the plant in a net pot with Rockwool and LECA. The LECA and Rockwool will wick up moisture and provide the water and nutrients the basil needs to grow.
The mason jar will be filled with a nutrient solution. As the basil grows, the water level will go down as the plant absorbs water in the mason jar.
Materials Needed To Grow Basil Hydroponically
- Basil Cutting – You can take a cutting from one of those basil plants from the grocery store. Simply cut a 4-inch section of basil just above a leaf node. Then remove all leaves from the bottom two inches of the cutting. Alternatively, you could grow basil from seeds in Rockwool.
- Net Pots – Use 2-inch net pots if you are going to use a standard mason jar, and use 3-inch net pots if you are going to use a wide-mouth mason jar.
- Hydroponic Nutrients – Basil requires nutrients that are high in nitrogen. Dyna-Gro Foliage Pro is a good nutrient solution for growing basil because it is formulated for the vegetative phase of a plant’s growing cycle. Miracle-Gro’s Water Soluble All Purpose Plant Food has also worked well for me.
- Distilled Water – You can use tap water for Kratky hydroponics. However, it is important to ensure that you are not using hard water for hydroponics. It is difficult for plants to absorb nutrients from hard water.
- Mason Jar – Note that the light entering clear glass promotes algae growth, so it is a good idea to block out the light by painting your mason jars. I use amber Mason Jars because I think they look more aesthetically pleasing. So far, I have not had any algae problems when using the amber Mason Jars.
- pH Up and pH Down – pH Down is made of food-grade phosphoric acid, and pH Up is made of potassium hydroxide and potassium carbonate. To learn more about the importance of pH in hydroponics, check out this article I wrote.
- Rockwool
- Lightweight Expanded Clay Aggregate (LECA)
- pH/EC Meter
- Root Hormone – Plant hormones that stimulate root growth in plants. There are commercially available rooting hormones in the form of liquids, gels, and powders. Click here to check out my article on root hormones.
- Latex Gloves
Steps For Growing Mint Hydroponically
Here is how I set up my Mason Jar hydroponics system.
Step 1: Prepare the Nutrient Solution
To prepare the nutrient solution, pour the distilled water into a clean bucket or large bowl. Then mix in small amounts of nutrients and measure the electrical conductivity (EC) using your EC meter. The EC should be between 1.0 and 1.6.
Then check the pH of your nutrient solution. It should be between 5.5 and 6.0. If the pH of your nutrient solution is outside of this range, use pH Up or pH Down to adjust it. Only add a small amount of these chemicals at a time. Otherwise, you may change the pH too much.
Step 2: Soak the Rockwool
Next, put some nutrient solution in a small bowl and place a Rockwool cube in the liquid. Allow the Rockwool to soak in the nutrient solution for 10 to 20 minutes. Make sure you are using gloves when handling dry Rockwool.
Step 3: Dip Cutting in Rooting Hormone
While the Rockwool is soaking, dip the basil cutting in the rooting hormone. I use the gel rooting hormone because it is easy to use. Allow the rooting hormone to soak into the cutting while you finish the prep work.
Step 4: Rinse the LECA
The next step is to rinse the LECA. Place the LECA in a strainer and rinse off the pebbles in the sink. Then agitate the pebbles by gently shaking the strainer. This will help remove any clay dust.
Step 5: Assemble the System
Finally, assemble your Kratky hydroponics system. Remove the Rockwool from the bowl it was soaking in and use a sharp knife to cut a slit in the cube. Put your cutting into the slit and set aside.
Then fill your net cup about 1/3 full of LECA pebbles. Place the Rockwool on top of the LECA and fill the remaining space with more LECA pebbles. Make sure that the Rockwool is completely covered with LECA as this will prevent algae from growing on the Rockwool.
Fill the mason jar with the nutrient solution you prepared in Step 1. When you place the net cup in the Mason Jar, the water level should be about halfway up the net cup.
Step 6: Maintenance
Every week, use your EC meter to check the nutrient solution. Over time, the EC of the nutrient solution will increase. As the plant takes up water, the concentration of nutrients, and thus the EC, increases. It is important to change the nutrient solution regularly because of the high concentration of salts in an “old” nutrient solution can adversely impact plant growth.
When changing out the nutrient solution, it is also a good idea to rise off the LECA pebbles with clean water because salts will eventually build up.
Every couple of weeks, it is also a good idea to thoroughly clean your Mason Jar. This will minimize the chance of any pest problems and will decrease the amount of salt buildup on the jar.