
Have you ever wanted to grow your own food at home but don’t have a lot of space for a vegetable garden? Fortunately, there is a way to grow your own food at home even if you live in a small apartment. Growing microgreens is a fun hobby and is probably one of the simplest ways to produce your own fresh produce year-round.
Some people are even able to transform their microgreen growing hobby into a profitable business venture, but that is a topic for a different blog post.
No matter your reason for growing microgreens, this article will provide you with the information you need to get started.
What are microgreens?
Microgreens are small, leafy vegetables that are harvested during the early stages of a plant’s growing cycle. They are sometimes called vegetable confetti. Microgreens are harvested just after the cotyledon leaves develop. Cotyledon leaves are also known as seed leaves and are defined as the embryonic leaf in seed-bearing plants. The cotyledon leaves are the first to appear from a germinating seed.
It is important to understand that microgreens are not the same thing as sprouts. Although microgreens and sprouts can be grown from the same seed, they look and taste different. This is because microgreens and sprouts are harvested during different parts of the growing cycle. Sprouts are germinated seeds. In contrast, microgreens are harvested just after the cotyledon leaves develop which occurs a little further into the growth cycle. If you want to learn more about the differences between microgreens and sprouts, check out this article I wrote.
You can use almost any vegetable seed to grow microgreens, but there are some companies that offer specialty seed mixes for microgreens. It is important to note that some seeds are not food grade which means they are not meant for human consumption. For example, some people use birdseed to grow sunflower microgreens. These seeds are meant to be eaten by wild birds and contain additives that could make humans sick.
Benefits of Growing Microgreens
In addition to being able to produce your own food, there are a number of benefits to growing microgreens. Some of these benefits are listed below.
Nutritional Benefits of Microgreens
One of the most significant benefits of growing microgreens is that they are packed with valuable vitamins and nutrients.
In fact, research indicates that microgreens may actually be more nutritious than the full-grown plant. Research conducted by Dr. Qin Wang, who is an associate professor at the University of Maryland at College Park, found that microgreens are 4 to 40 times more concentrated with nutrients than their mature counterparts.
Researchers believe this high nutrient density is due to microgreens being harvested immediately after germination when all of the nutrients the plant needs to grow are present.
Finally, eating microgreens is typically safer than eating raw sprouts. To grow sprouts properly, they need intense humidity. This an ideal growing condition for harmful bacteria. The potential danger of eating raw sprouts is not just speculative. In February 2020, the Food and Drug Administration (FDA) began an investigation of 39 cases of illness caused by red clover sprouts. Microgreens are grown in a much safer environment and do not have as high of a risk of foodborne illness.
Microgreens Are Flavorful
In addition to the nutritional benefits, microgreens are a delicious addition to many dishes. Just as they are packed with nutrients, microgreens are also packed with flavor. Microgreens often taste like a more intense version of the mature plant. For example, radish microgreens taste like a spicier version of radish bulbs.
You can use a variety of different microgreens to add certain flavors to your food. Microgreens complement salads, soups, drinks, and smoothies.
Not only are microgreens flavorful, but they also have a pleasant texture as the stems typically have a nice crunch.
Microgreens Are Quick and Easy to Grow
Another benefit of growing microgreens is that many types of microgreens are easy to grow at home. In comparison to other vegetables, growing microgreens requires few supplies and little skill depending on the species of plant. In addition, you can harvest most types of microgreens within 10 to 28 days of sowing the seed depending on the type of plant. Later in this article, I will talk about the best microgreens for beginners to grow.
Microgreen Growing Is Space-Efficient
Finally, microgreens are very space-efficient. One 10″x20″ growing tray produces at least a one week supply of microgreens for two adults. This means even people who do not have access to an outdoor garden can grow microgreens.
If you want to grow as many microgreens as possible, there are ways to use space very efficiently. For example, commercial microgreen growers use racks to maximize vertical space. Using racks with four shelves allow growers to produce at least 50 lbs of microgreens per month.
Because microgreens can be grown in small spaces, some researchers have even proposed using microgreens as a food source in space (Kyriacou et al. 2017).
Types of Microgreens
As previously mentioned, almost any type of vegetable or herb can be grown as microgreens. The table below lists some characteristics of commonly grown microgreens.
| Microgreen | Family | Description of Flavor | Soil vs Hydroponics | Growing Difficulty | Harvest Time |
|---|---|---|---|---|---|
| Arugula | Brassicaceae | Peppery | Hydroponics | Intermediate | 8 – 12 days |
| Broccoli | Brassicaceae | Light, crunchy | Hydroponics | Easy | 7 – 14 days |
| Cabbage | Brassicaceae | Sweet and crunchy | Soil and Hydroponics | Easy | 6 – 14 days |
| Collard Greens | Brassicaceae | A more intense version of collard greens | Hydroponics | Easy | 10 – 12 days |
| Kale | Brassicaceae | Mild nutty flavor | Soil or Hydroponics | Easy | 8 – 12 days |
| Kohlrabi | Brassicaceae | Sweet Broccoli | Soil or Hydroponics | Easy | 8 – 12 days |
| Mizuna | Brassicaceae | Mild peppery flavor | Hydroponics | Easy | 5 – 14 days |
| Mustard | Brassicaceae | Spicy and nutty flavor | Soil or Hydroponics | Easy | 7 – 12 days |
| Radish | Brassicaceae | Spicy | Soil or Hydroponics | Easy | 6 – 12 days |
| Cress | Brassicaceae | Crisp and peppery | Hydroponics | Easy | 10 days |
| Watercress | Brassicaceae | Sharp and peppery | Hydroponics | Difficult | 8 – 12 days |
| Chicory | Asteraceae | Mild bitter flavor | Soil or Hydroponics | Intermediate | 16 – 24 days |
| Endive | Asteraceae | Mild bitter flavor | Soil | Intermediate | 8 – 15 days |
| Lettuce | Asteraceae | Mild or slightly spicy depending on the variety | Soil or Hydroponics | Easy | 14 – 16 days |
| Sunflower | Asteraceae | Nutty | Soil or Coco Coir | Easy | 7 – 10 days |
| Carrot | Apiaceae | Carrot flavor | Soil | Intermediate | 14 – 28 days |
| Celery | Apiaceae | Celery flavor | Hydroponics | Intermediate | 3 – 5 Weeks |
| Dill | Apiaceae | Tangy and zesty flavor | Soil | Intermediate | 12 – 30 days |
| Fennel | Apiaceae | Mild anise flavor | Soil | Easy | 12 days |
| Parsley | Apiaceae | Parsley flavor | Soil | Intermediate | 21- 30 days |
| Chive | Amaryllidaceae | Strong onion flavor | Soil | Difficult | 14 – 28 days |
| Onion | Amaryllidaceae | Savory onion and garlic flavor | Soil | Easy | 14 – 21 days |
| Leek | Amaryllidaceae | Onion flavor | Hydroponics | Easy | 12 days |
| Amaranth | Amaranthaceae | Mild earthy flavor | Soil | Difficult | 8 – 12 days |
| Beets | Amaranthaceae | A mixture of beets and spinach | Soil | Easy | 10 – 12 days |
| Cucumber | Cucurbitaceae | Light, refreshing | Hydroponics | Easy | 7 – 12 days |
| Basil | Lamiaceae | Strong basil flavor | Hydroponics | Difficult | 12 – 16 days |
| Peas | Leguminosae | Sweet, fresh flavor | Soil | Easy | 12 – 16 days |
Best Microgreens for Beginners
Now that you understand what microgreens are and are aware of some of the benefits of growing them, let’s talk about what beginners should grow first.
Some people want to start out growing basil or cilantro microgreens. Unfortunately, these are some of the most difficult microgreens to grow. Growing microgreens is a more enjoyable hobby if you start by growing beginner-friendly microgreens.
Although there probably are people who have successfully grown some more advanced microgreens their first time, many people will end up losing their entire crop. This results in frustration and money loss as some seeds can be pretty expensive.
Radish Microgreens
Radish microgreens are one of the easiest and fastest microgreens to grow. In general, they are ready to harvest 7 to 10 days after sowing. Radish microgreens are also very forgiving which makes them an awesome choice for first-time growers.
In addition to being easy to grow, radish microgreens are delicious. I was surprised at how spicy these microgreens are the first time I tasted them. I like radish microgreens because they add the same peppery flavor to your food as radish bulbs, but the texture is more pleasant on sandwiches and salads.
You can purchase seeds to grow radish microgreens from Amazon or Trueleaf Market.
Radish microgreens can be grown hydroponically, and the seeds do not need to be soaked before sowing. However, I soak the seeds prior to planting and this tends to yield good results.
Pea Shoot Microgreens
Another popular type of microgreen for beginners is pea shoot microgreens. Pea shoots can be described as the beginnings of pea vines where lacy tendrils start to unfold. These microgreens have a sweet and tender flavor. Snap pea microgreens are a great addition to smoothies, juices, and salads.
Pea shoot microgreens are ready to harvest any time after the true leaves open. This typically occurs 10 to 14 days after sowing the seeds. However, if you wait for a few more days to harvest, the leaves will get a bit bigger and become more tender. They will also develop a sweeter flavor.
Unlike radish microgreens, pea seeds are quite large which means that pea seeds should be soaked in cold water for 8 to 12 hours prior to sowing. It is important to adjust the pH of the water you are using to soak the seeds. Microgreens prefer a pH of around 6.0 to germinate. In general, tap water has a pH that is higher than this optimal pH. Use pH Down to lower the pH of tap water. To learn more about pH, check out this article I wrote.
Like many other microgreens grown from large seeds, pea shoot microgreens prefer to be grown in soil. A good potting soil mix for microgreens consists of 50% potting soil and 50% perlite or vermiculite. The perlite and vermiculite are important because they allow for better drainage.
Sunflower Microgreens
Sunflower microgreens are probably the most popular type of microgreen. They have a nutty flavor and taste similar to a sunflower seed. As a result, sunflower microgreens make a great addition to soups, salads, and sandwiches.
Like the other beginner-friendly microgreens, sunflower microgreens grow quickly. They are ready to harvest within 7 to 10 days.
Like pea shoot seeds, sunflower seeds are large and should be soaked in cold water (with a pH of about 6.0) for 8-12 hours prior to sowing. They should also be grown in soil or coco coir.
How to Grow Microgreens
As previously mentioned, growing microgreens does not have to be a difficult process. However, it does require some equipment, and there are some steps you need to follow in order to be successful.
Materials Needed To Grow Microgreens
The materials you will need to start growing microgreens are detailed below.
Growing Trays
The most common size of a growing tray is 1020 (10″ x 20″). One growing tray will typically produce 5 to 6 ounces of microgreens depending on what you are growing. That may not sound like a lot, but it is a large portion of microgreens for one or two people to eat. If you are only growing microgreens for one or two people, it may be better to use smaller growing trays (10″ x 10″).

If you are going to be growing your microgreens hydroponically, make sure you purchase growing trays that do not have drainage holes. If you are going to be growing microgreens with soil, it may be a good idea to get a growing tray with drainage holes.
Keep in mind that you do not need to purchase “official” growing trays to grow microgreens. Some other options include stainless steel trays, glass baking dishes, Tupperware, pie tins, foam to-go containers, and clamshell containers. Just make sure you are growing your microgreens in food-safe containers because some plastics are toxic.
Seeds
You can purchase seeds from a number of places including big box stores, gardening centers, or online. The most popular online stores that sell microgreen seeds are Johnny’s Selected Seeds and True Leaf Market.
Keep in mind that it is cheaper to purchase microgreen seeds in bulk. For example, if you purchase Detroit Dark Red Beet Microgreen Seeds from True Leaf Market, the unit cost for a 4 oz package is $1.41 per ounce. However, if you purchase a 25 lb bag, the unit cost is $0.43 per ounce.
Most seeds will remain viable for a few years if you store them in a dry, cool area. This means if you purchase seeds in bulk, they will not go bad if you cannot use the whole package within a year or two.
Always purchase food-grade seeds. If seeds are not designated as food-grade or are not meant for growing food, they could contain additives/chemicals that are harmful to human health.
Growing Medium
The table above indicates whether different types of microgreens can be grown in soil or hydroponics. However, a number of growing mediums can be used to grow microgreens. Some of these growing medium options are listed below.
Hemp Growing Mats – Mats made of woven hemp fiber. They are easy to use and help distribute water evenly in growing trays. Woven hemp mats hold water very well which reduces the number of times you have to water your microgreens. In addition, hemp growing mats are not as messy as soil or coco coir. Unfortunately, growing mats are expensive compared to other growing mediums.

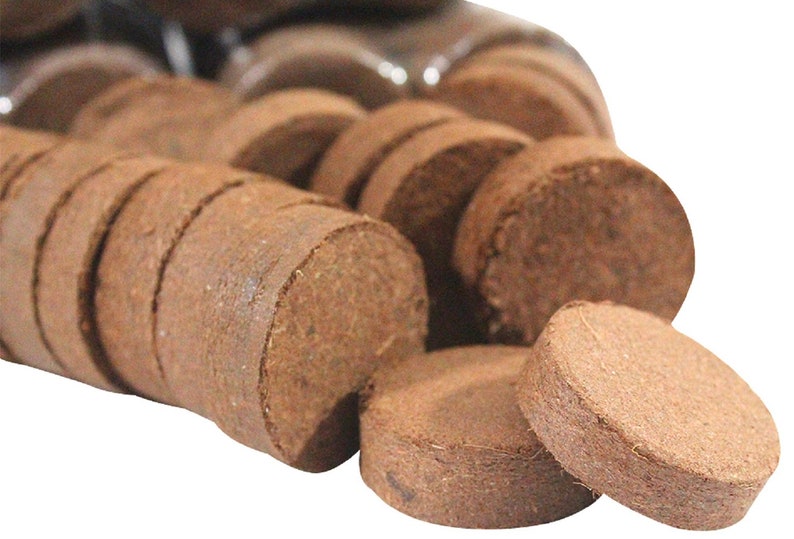
Coco Coir – A growing medium that consists of natural fibers. Coco coir typically comes in compacted discs or blocks that need to be hydrated before use. It’s a great sustainable hydroponic growing media that can be reused two or three times as long as it is sterilized. In addition, coco coir holds water really well.
Burlap – One of the cheapest growing mediums that can be used to grow microgreens. Burlap is a woven fabric that is used for packaging products like coffee or feed. Some feed mills give away torn or damaged burlap sacks for free. Although burlap is an inexpensive growing medium, it is one of the most difficult growing mediums to use for growing microgreens.
Soil – One of the most popular growing mediums is potting soil. Some microgreen growers prefer to mix their own soil using potting soil, vermiculite, perlite, and compost. Happy Frog potting soil, which is manufactured by Smart Naturals, is commonly used for growing microgreens. Some types of microgreens are more sensitive to the quality of potting soil including microgreens with vibrant colors.

Lighting For Microgreens
Like other plants, microgreens need light in order to photosynthesize and grow. In general, microgreens need 6 to 8 hours of light per day after the microgreen seeds have sprouted.
Without enough light, microgreens can look pale and weak. If you are able to put your microgreens next to a sunny window, you probably do not need to worry about purchasing artificial lighting.
However, sunny windows may not be able to provide sufficient light if you plan to grow several trays of microgreens at one time. Fortunately, artificial lighting can be used to supplement natural sunlight.
Artificial Lighting For Microgreens
Artificial lighting is described in terms of color temperature which is measured in units of kelvin (K). Natural sunlight has a color temperature around 6,500 K; therefore, using artificial lighting with a color temperature around 6,500 K is ideal. The most cost-effective lighting option for growing microgreens is T8 (1-inch diameter) fluorescent lights.
If you are willing to spend a little bit more money, you may also consider purchasing T5 (0.6-inch diameter) lights. T5 lights are significantly smaller than T8 lights, but they are capable of generating as much (and sometimes more) light in a smaller area. In other words, more T8 lights are needed to produce the same amount of light as a few T5 light bulbs.
Placing artificial lights too close to microgreens could burn the plants. Keep your grow lights 6 to 12 inches from your microgreen trays. If your grow lights throw off a lot of heat, consider keeping the lights even farther from your microgreens. Remember that you may have to adjust the lights as your microgreens grow.
Heating Mat For Growing Microgreens
When growing microgreens, it is important to provide ideal conditions for germinating seeds. In general, seeds will grow better in warm conditions. A heating mat can provide seeds with these conditions. Although seeds will germinate without a heating mat, a heating mat will increase the rate of germination as well as the percentage of seeds that will germinate.
Although this may sound like an expensive piece of equipment, heating mats only cost between $10 and $30 on Amazon.
In addition to growing microgreens, a heating mat can be used to keep plants warm during the wintertime.
Scissors or Sharp Blade for Harvesting Microgreens
Depending on how many microgreen trays you plan on growing at a time, it may be worth it to spend a few extra dollars on high-quality scissors or knives. Dull blades make harvesting much less enjoyable.
If you are looking at buying a higher-end pair of scissors or a high-quality knife, consider ceramic scissors or knives. Ceramic stays sharp for a much longer time than traditional steel. In addition, ceramic blades prevent metals from getting into your food.
pH Up/pH Down
pH Up and pH Down are chemicals used to adjust the pH of water. As you may guess, pH Up is used to increase pH, and pH Down is used to lower pH.
pH Down is made of food-grade phosphoric acid, and pH Up is made of potassium hydroxide and potassium carbonate. When adding pH Up or pH Down to your nutrient solution, only add a little bit at a time. Typically, you will only need 1-2 milliliters of these chemicals per gallon of water to adjust the pH.
You can purchase pH Up and pH Down on Amazon or at hydroponic supply stores. They are typically sold in a package together.
Other Materials For Growing Microgreens
- Hydrogen peroxide
- StarSan
- White vinegar
- Warm, soapy water
- Food scale to weigh seeds
Steps For Growing Microgreens
- Compile the materials listed above.
- Sanitize your growing tray. Clean your tray with warm, soapy water. Then spray the tray with a hydrogen peroxide solution. After ten minutes, rinse the hydrogen peroxide solution off of the growing tray. Finally, use a clean cloth to dry off the tray. Alternatively, you can use StarSan to sanitize your growing trays.
- Sanitize your seeds by soaking the seeds in a mixture of 4 tsp of white vinegar, 4 tsp of food-grade hydrogen peroxide, and 1 quart of water.
- If applicable, soak your seeds for 8 to 12 hours. Make sure the pH of the water is 6.0. You can adjust the pH of the water using pH Up or pH Down.
- Soil – Fill your growing tray with sterile soil (if applicable). The soils should be no more than 2 inches deep. Lightly spray the soil surface with water.
- Hydroponics – If you are using a growing mat, pour water into your growing tray. Make sure the pH of this water is between 5.6 and 6.5. Then place your growing mat on the water surface and allow it to absorb water. Tilt the tray and pour out any excess water.
- Evenly spread your seeds over the soil or growing mat (see seeding density guidelines shown below).
- Place the growing tray on the heating mat and cover the seeds with another growing tray for the blackout period associated with the microgreens you are producing (see table presented in the next section).
- After the specified blackout period, place the growing tray under your grow lights or by a sunny window. Check your microgreens every day until it is time to harvest and water when necessary.
- Your microgreens will be ready to harvest 6 to 28 days after sowing depending on the type of microgreens you are growing. To harvest, cut the microgreens about an inch above the soil level or growing mat.
Planting Densities and Blackout Times
| Species | Presoaked? | Days in blackout dome | Seed density per 1020 growing tray (grams) |
|---|---|---|---|
| Pea | Yes | 5 | 267 |
| Sunflower | Yes | 5 | 129 |
| Beet | Yes | 5 | 43 |
| Dill | Yes | 7 | 17 |
| Fennel | Yes | 7 | 22 |
| Coriander | Yes | 8 | 43 |
| Leek | Yes | 5 | 43 |
| Parsley | Yes | 8 | 17 |
| Radish | No | 5 | 89 |
| Arugula | No | 4 | 7 |
| Kale | No | 5 | 28 |
| Cabbage | No | 5 | 28 |
| Cress | No | 3 | 41 |
| Mustard | No | 4 | 20 |
| Broccoli | No | 3 | 28 |
| Amaranth | No | 4 | 7 |
Dealing With Mold On Microgreens
One of the most common problems that microgreen growers deal with is mold. Mold found on microgreens will have the appearance of black soot or white cobwebs.
You should never eat microgreens infected with mold. Although some types of mold are not dangerous to humans, it is likely that bacteria will grow alongside the mold. For this reason, the United States Department of Agriculture (USDA) recommends throwing away soft fruits and vegetables that are moldy.
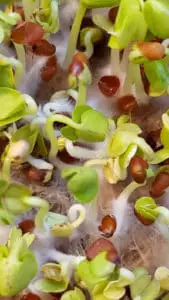
Root Hairs vs. Mold
Even you see a lot of white, fuzzy stuff on your growing tray, do not panic! There is a good chance that you are seeing root hairs rather than mold.
In order to avoid throwing out microgreens that are still good, it is important to understand the difference between mold and root hairs. Mold will look like a spiderweb. In contrast, root hairs look like little, fuzzy hairs growing from the stems of your microgreens.
You may have to look very closely to be able to tell whether your microgreens are infested with mold or growing root hairs. If you still are not sure whether you are seeing mold or root hairs, try the spray test. The spray test involves gently spraying water on your microgreens from the top. If the white fuzz disappears, there is a good chance your microgreens are growing root hairs. Mold will not disappear after rinsing.
Causes of Mold Growth on Microgreens
The most common causes of mold growth are poor air circulation and excess moisture.
Excess Moisture
In order to prevent mold growth, avoid overwatering. When growing microgreens in soil, remember that the soil should be moist but not drenched. When you press your fingers into the soil, it should feel spongy, not muddy.
When growing microgreens hydroponically, make sure the growing pads are saturated during germination. However, once the microgreens are uncovered, the growing pad should only be damp. If the growing pad dries out, replenish the water at the bottom of the tray.
In addition to poor drainage, excess humidity can also promote algal growth. If you live in a humid area, consider purchasing a dehumidifier. Set the dehumidifier to 50-60%.
Poor Air Circulation
Poor air circulation is another common cause of mold growth. If you start to see signs of mold and are growing your microgreens indoors, try moving your plants outdoors for improved airflow. Another option is to place fans near the microgreens growing tray. Increasing airflow will also reduce humidity. However, it is important to keep in mind that fans can blow mold spores to other growing trays.
Overseeding
Overseeding can also make mold growth worse because as the plants grow, the higher density of stems can cause poor air circulation especially. Overseeding makes microgreens particularly susceptible to mold in hot and humid conditions. During the summer, it may be a good idea to reduce the planting density of your microgreens by up to 50%.
Tips For Preventing Mold on Microgreens
Here are some tips for preventing the growth of mold on microgreens.
- Clean your containers to prevent any bacteria or microbes from infecting your next batch of microgreens.
- Sanitize your seeds by soaking seeds in a mixture of 4 tablespoons of white vinegar and 4 tablespoons of food-grade hydrogen peroxide in a quart of water for 10 minutes.
- Use a dehumidifier to maintain a relative humidity between 50 and 60.
- Avoid overseeding because the higher density of stems can cause poor air circulation.
- Use a sterile growing medium or soil. To sterilize the soil, bake it in the oven for 45 minutes at 180°F.
- Water your microgreens from the top during the germination phase, and water from the bottom during the vegetative phase.
How to Remove Mold From Microgreens
If your microgreens have become infected with mold, there is still some hope of salvaging your crop. Some tips for removing mold from microgreens are listed below.
- If the mold is only covering a small area, remove the infected stems to prevent it from spreading.
- Try growing your microgreens in soil. Many growers find that it is easier to control mold when their microgreens are planted in soil. If you live in a humid area or continuously have issues with mold, trying growing microgreens in soil instead of hydroponically.
- Disinfect the microgreens by spraying them with a mixture of water and a few drops of hydrogen peroxide or grapefruit extract.
Fungus Gnats
Like mold, excess moisture attracts fungus gnats. This means that fungus gnats can become a problem for many microgreen growers. Adult fungus gnats can carry diseases, specifically fungal diseases.
In addition, larvae can adversely impact your plants. Adult fungus gnats lay eggs in the growing medium. Once the eggs hatch, the larvae will attach to the roots of the microgreens and drain the nutrients from the plants.
To get rid of fungus gnats, set a trap near your microgreens. There are a couple of options for setting this trap. The first option is to pour about an inch of apple cider vinegar into a cup. Then add a couple of drops of dish soap and mix thoroughly. Finally, cover the top with plastic wrap and poke small holes in the plastic. The fungus gnats will fly into the trap and will not be able to get out.
You can also set the same trap using white wine.
If you want to get rid of fungus gnats even more aggressively, another option is to set yellow sticky traps around your microgreens. Insects are attracted to the yellow color. These traps do not contain any harmful chemicals, but they can get a little gross as insects begin to collect on them.
How to Properly Wash and Store Microgreens
After harvesting your microgreens, you may be excited to dig in and start enjoying your bounty. But not so fast! It is still important to properly wash and store your microgreens. Otherwise, your beautiful microgreens can turn into a mushy mess.
Washing Microgreens
Even if you do apply pesticides when growing your microgreens, it is still important to wash them regardless of your selection of growing medium. This is because microgreens are living plants, and there can be harmful bacteria growing on them. Bacteria, yeast, and fungi are still potential issues even one or two weeks after harvesting your microgreens.
Although it is important to wash your microgreens, it should be noted that they can get mushy if you do not wash your microgreens properly.
Technique 1: Rinse and Pat With Paper Towel
This is probably the simplest technique for washing microgreens. First, rinse your microgreens with cold water. Then gently pat them dry with a paper towel or clean towel. Make sure you dry them thoroughly. I usually go through two or three paper towels when drying one serving of microgreens.
Technique 2: Dunk in Water and Shake it Off
If you grow your microgreens in a small tray, the “dunk and shake it off” technique may work well for rinsing your microgreens. Note that you will be harvesting unwashed microgreens in this method.
Simply dunk the top couple of inches of the microgreens into a bowl of water. After dunking the microgreens into the water, shake off the excess moisture.
This may not be a good washing technique if you are using soil as a growing medium.
Technique 3: Salad Spinner
You will need a salad spinner for this technique. As long as the holes of your salad spinner ar not too large, you can just use a regular salad spinner for washing microgreens.
First, put your microgreens in the basket of your salad spinner. Then rinse them with some cold water and spin. Dump out any excess water and remove the microgreens. Finally, use a dry paper towel or cloth to gently pat the microgreens dry.
Technique 4: Combination
Finally, you could use a combination of the methods above to wash and dry your microgreens. Just remember to dry them thoroughly.
Storage
It is best to eat your microgreens as fresh as possible. For optimal freshness, cut the microgreens from your growing tray when you are ready to eat them. Realistically, that is not going to work all of the time. For this reason, it is important to learn how to store your microgreens properly.
Microgreens can be stored for 7 to 21 days depending on the type of microgreens. For example, cabbage microgreens can be stored in the refrigerator up to 14 days, and radish microgreens can be stored in the refrigerator up to 21 days (Berba and Uchanski, 2012).
It is important to remember that you should NOT store wet microgreens in the refrigerator. This will result in your microgreens becoming a stinky, mushy mess.
If you are going to store microgreens in the refrigerator, keep them in a Ziplock bag on top of paper towels. Keep them covered until you are ready to use them so they don’t wilt.
Ideally, the refrigerator you use to store microgreens should be set at a temperature of 39°F. Researchers at New Mexico State University conducted a study that found that the shelf life of arugula and cabbage microgreens decreases from 14 days to 7 days when the storage temperature was changed from 10°C (50°F) to 4°C (39.2°F). Similarly, the shelf life of radish microgreens decreased from 21 days to 14 days when the storage temperature was changed from 10°C (50°F) to 4°C (39.2°F) (Berba and Uchanski, 2012).
Finally, your microgreens should be stored in a dark area. Researchers at the University of Maryland found that radish microgreens deteriorate more quickly when exposed to light (Xiao et al. 2014).
Final Thoughts
I hope you found this information helpful, and I wish you the best of luck on your microgreen growing journey!